Rope Rap - Spider Web
...said the Spider to the Fly
by Paul Sehm
This is the continuation of the "Rope Rap" article in The Leather Journal issue 23.
You should have the chain frame in place by now (see last issue). Now you will have to measure the lengths and widths to find the centers and the fourths so you have
four equal parts on each of the four chains. Measure and count the lengths to ensure you are in line all the way around.
One thing that will help in keeping the chain taut and straight is turn-buckles, one on each side, top and bottom. Pull the chain moderately taut. There will be
some slack in it anyway, but this you will take up as you tie the web.
The easiest way to start is with a four inch steel ring. I suspended this ring with a little string in the center of the chain frame. I added more strings at the sides
and bottom, tying in the chain and pulling them taut. Keeping the ring in the exact center of the chain frame and pulling the strings tight is not as easy as you might
think, but it is important for the web to have uniformity.
Start with a long and rather heavy rope. I am using a half-inch diameter cotton twist. Depending on your area and size, the length will vary. It is best to use one or
two long lengths than a number of short ones.
A simple overhand knot at the end of the line will keep the end from pulling through the chain and can be moved easily.
Start at the top center of the chain, run down to the ring, make a full turn around the ring, and run up to the chain at the quarter mark; run through this chain
length. When you have this down, cut the top string away, leaving the side strings and bottom strings. Also pay attention to the direction of the rope as it winds
around the ring and through the chain. It should go around the ring the same way on every turn.
Run the rope from the quarter link to the comer. If you want to take this web down and put it up again, do not run the line through the screw eyes at the comer like
I did. Run it through the last link of the chain. Go through the chain and down to the center of the vertical side (your little string should be there). Go through
the chain to the ring and turn around the ring once. Go back to the vertical side chain to the other quarter mark and go through the link.
Now go back and cut away the string holding this side of the ring. By now, you should have an idea as to the sequence of tying onto the chain and the ring. Continue
this all the way around.
If you run out of rope, simply run the end through the chain at its regular position, tie an overhand knot in it, and start a new rope as you did this one at the next
quarter of the chain. When you get all the way around, end it by going through the chain and an overhand knot ends it as it began.
You will find that the lines are looser or tighter than what you started out with. This is where these overhand knots come in. By pulling the rope up tight and
slipping the overhand knot in and out, you can adjust the tension more evenly. This structure should be rather firm and tight.
Now the fun comes in: the "Spiral." I used a half-inch cotton rope for the spokes and a one-fourth inch cotton rope for the web. Do not use a braided line (clothesline)
for the web. You will need the ribs that are in a twisted rope to keep the web from slipping.
Use as long a rope as you can get. Roll it in a ball or a manageable twist and strap at the center. Tie on to the ring with a square knot. Measure up about a hand's
length and make your first knot. It is easy to use your hand to measure as you tie onto the spoke, simply hold the running end in one hand and place your other hand
on the spoke (standing line) near the knot. Keep the spiraling knots as even as you can.
This knot is easy; it is one of a large number that is called a running hitch. Draw the running line across the spoke, take your finger around the back of the spoke,
and hook the running line, draw a loop around and behind the spoke to the front.
The loop should be large enough so that the ball of rope can pass through it. Work from the same direction as you arc going. The loop should not twist back over itself,
nor should the running line. Pull the running lines snug in the direction of the path. Your knot should flip around the spoke and lay flat and even. Go to the next spoke
and do the same thing.
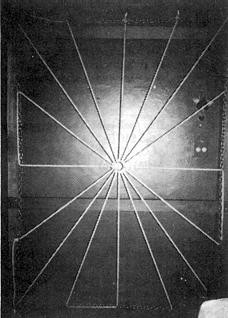
The "spokes" of the web in place.
|
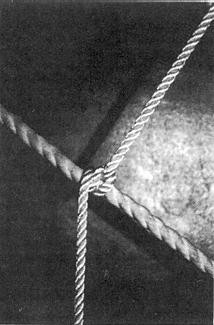
A running hitch knot.
|
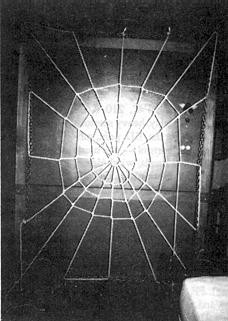
The spiraling in progress.
|
|


 Articles and Info
 Books
Books Contact Us
 Humor Pages
 Links
Links Stories
 Training
 Welcome
Page
Welcome
Page