jquery slideshow by WOWSlider.com v8.7


Rope Rap - Spider Web
|
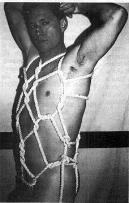 Photo A The basic harness should be tied off securely at the side of the bottom. |
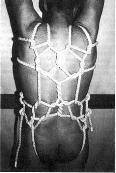 Photo B The basic harness should also be tied off securely at the back of the bottom. |
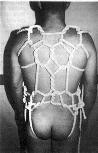 Photo C Run the ends out to top of the shoulders and turn any standing lines there. |
Now you have a frame that will hold most anyone. You can use two more chains, one at the top and the other at the bottom. The two horizontal chains are nice to have, but for this project are not essential.
Now, on Dana: I put him in a rather simple harness. Most every one I've shown you in the past will work. It should be on the tight side and tied off securely (Photos A and B). A rather long piece of rope is turned around the two standing lines just behind the neck. Run the ends out to the top of the shoulders and turn around any standing lines that may be there (Photo C).
Now there are two or so ways of going from here. On Dana, I worked running hitches down his arms. These are fast and do a good job, but as you tie onto them, they become tighter around the arms. For most of you, I recommend overhand knots, which won't slip. I made running hitches (or overhand knots) at the armpits, just above the elbow, just below the elbow, and at the wrist. These should be in a straight line to the outside of the arm. Run the line across the palm between the thumb and the fingers (Photo D).
Come up to the standing line at the wrist and tie an overhand knot (I did running hitches, but I want you to do overhand knots). It should be on the other side of the arm from the first ones. Do the same to all the standing lines around the arms up to the ones at the armpits. Tie off at the armpits and then tie onto the bondage harness as close to the shoulders as possible. You should have a good piece of rope left on both arms. Let it hang for now.
Now, a similar technique is used for the legs. Use a lengthy piece of rope and tie onto the body harness between the legs under the crotch. Again, I made running hitches and again, I want you to use overhand knots. Run around the legs as high up as you can. It should come up right under the buttocks. Tie an overhand knot on the standing line around the legs at the inseam. Run down to just above the knee, another one just below the knee, and again at the ankles (Photo E).
Run the line under the foot at the instep and up to the standing line at the ankle. Tie onto this line with an overhand knot. As you did on the arms, run the line up the outside of the legs, tying onto all standing lines around the legs. At the hip, tie onto the standing line around the top of the legs and run to the nearest standing line of the body harness at the hip. Securely tie it off on the standing line. Let the left-over rope hang. Check to make sure the rope around the arms and legs isn't too tight. Make all adjustments necessary to keep the arms, legs, and body harness uniformly firm, but not constricting.
Position your subject where you want him between the chains. Using the rope you have left over from the arms and legs, start to tie onto the chain. Start at the hips: find a link in the chain parallel to the knot at the hips, run the line through the link and back to the standing line that runs vertically on the outside of the legs.
Run back and forth down the leg from the chain to the standing vertical line. It's best to do both legs at the same time, pulling the lines up evenly and counting the chain links so both legs are squared off evenly. If you want, a rope can be run up the inside of the legs, too. This will keep him from spreading his legs out farther and loosening the outward pull.
Next, do the torso. Start at the hips and work up, tying into the body harness on the vertical standing I lines. Keep these lines even with equal tension. Remember, as you pull these lines up, more and more pressure is being put to bear on the body harness and the legs. The arms come next. You can tie them in any position. Do them the same way you did the legs. Do not use the standing lines around the arms, but the lines alongside the arms.
Also, remember, if the arms are up over his head or up and out as spread-eagle, then the circulation to the hands and arms is reduced. Care must be taken to keep the blood flowing up to the hands.
If you did add an overhead chain, you can tie into that, too. There is no end to where you can go from here. If you look carefully, Dana also has a little cock-and-ball bondage going, too (Photo F).
If all this is done carefully, your playmate can stay in this harness for a long time, with most of the playthings available for fun, not to mention a little hot wax. This is a good harness, arm and leg treatment, to use with a Spider Web. The screw eyes and chains are also used for the Web. Keep all this in mind for the next issue.
 Photo D Run the line across the palm between the thumb and the other ringers. |
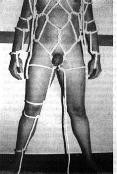 Photo E Run down to just above the knee, below the knee, and at the ankles. |
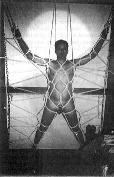 Photo F Dana, Papa Bear's little "fly", all tied up for action in Papa's Spider Web harness. |
 Articles and Info
 Books
Books Contact Us
 Humor Pages
 Links
Links Stories
 Training
 Welcome
Page
Welcome
Page