Rope Rap
Plastic Wrap Mummification
Part 1
by Paul "Papa Bear" Sehm
The other day I was playing with an old playmate, who at the time seemed a little loud. So, instead of the usual rope I got out the plastic wrap and started to do a
number on him. He had a great time and after it was all over and I cut him out he said something that amazed me:
"I didn't know that you were into this, tool You only talked about rope and stuff like that. Can you do other things too?"
Well, to answer your question, yes I can, and do.
I mentioned it to Dave Rhodes and he thought it would be a terrific idea to veer off from rope for a while and do some other kind of bondage.
This article and the next one will deal with plastic wrap, duct tape and one or two related things. Got to keep your attention with something different.
Saran Wrap is only the brand name of the best known product. Any plastic food wrap (plastic food?) will do just as well with a few adjustments as you go.
Saran Wrap, and the better grades of its kind tend to be heavier and stronger. The generic stuff is thinner, but easier to handle. The cost is about the same. You will
use less of the better brand and more of the cheap shit.
It comes in different lengths and widths. 100 square feet and 200 square feet seem to be available in more brands. Larger rolls tend to be awkward to handle, especially
when working in hard to reach areas.
How much you want to start with depends on the way you want to work. I would say that you'd be safe it you bought three 200 foot rolls. You do not want to come up
short at the end.
Start by cutting one roll in half. This is best done with a sharp knife as cleanly as you can. Any tears and rips along the cut edge will give you nothing but trouble.
If it tears on a diagonal as you unroll it there is a tear or barb. Make a razor cut on the edge to get a clean cut.
When you proceed with the wrapping keep the roll unwinding from the bottom of the roll and you will find that it is easier to handle.
Also, I am right handed. It is easier for me to work left to right. If you are a south paw, you may find it better the other way. Or better yet, wrap both way ? it
won't hurt.
Now, this is George, also known as Furr. If you don't know him from all the usual places, you might look to find this furry cub bear in one of the early Rope Rap
columns. If you like cub bears and are a bear yourself, you might want to drop a line to Furr and say "howdy." I would be happy to pass all fan mail along.
(See address at the end of this story.) l used the new colored plastic wrap (red/pink) in this scene. This was to make it visible in the photos. For private sessions
I much prefer the clear.
I start with one of the full rolls of wrap. The half roll will be used much later. Wrap the arms separately first. Start near the armpits and work down. Wind the wrap
out past the end of the fingers and break off. Oops! Not the fingers ? the plastic wrap! Roll out about a foot of wrap, hold the roll firmly in one hand and the wrapped
portion in the other and slowly pull on the roll. It will stretch and cling to itself and then break in a fairly straight line. You will have a roll-end you can find
and roll out easily.
Photo A
The body comes next. Wrap it separately, much like you did the arms. Start at the armpits and work your way down to just below the end of the fingers. That is if the
arms are at your subject's sides. You can put the arms in a number of positions, but for now, let's keep it simple.
You will find that by pulling on the unwinding roll as you go that the wrap stretches and conforms to the contours of the body. It also clings to itself better, too.
By wrapping the arms and body separately it keeps the arms and hands from moving under the wrapping. The arms will stick firmly to the body wrapping and will not move.
If you do not follow this step first and wrap the arms and body as one unit, the victim/subject will be able to move their arms and fingers under the wrapping.
Photo B
With the arms straight at the sides, wrap the arms and body together. Start at the top of the arms just under where the shoulders break - the higher, the better. Work
down to the end of the fingers again and make sure you got the fingers good.
Photo C
Now got the half roll. You want to go over the top of the shoulders at a diagonal. Start at the right hip, come up to the left shoulder near the base of the neck. Come
down the back to the right hip and break off. Do the same on the other side. Start at the front of the left hip, come up over the shoulder as on the right and down the
back to the left hip and break off.
Now the hard part! Start at the right hip like before, but come up the body a little more to the outside shoulder. You want to catch the edge of the first band around
the arms and chest. Continue down the back to the right hip. Do likewise on the other side. If the shoulders are too broad, or the half rolls are too short, then a
third band of wrap will be needed. It is important that these shoulder bands are overlapping and pulled taut enough to cling together.
Photo D
The diagonal shoulder bands are secured by a tight, horizontal wrapping, starting at the top of the shoulders and winding down all the way to the ankles. At this
point, the legs are drawn together and the wrapping is pulled good and tight. Care must be taken to ensure you do not topple your subject. (The tool will fall like
a log and will probably land on the head first!) Be careful! (Editor's note: ft is wise to have another person on hand to steady the subject while you are in the
process of wrapping to prevent injury)
At this point, you can go back and add one or two layers, keeping the winding taut and even. It you are using the inexpensive wrap, about three layers will do it.
Photo E
The subject should be quite stiff and straight. You should be able to take your subject by the shoulders and carefully lay the person on their back. The subject will
lie down in one piece with surprisingly little bending.
Photo F
Take a pillow, or the like, and place it under the legs, just below the knees. This will raise the feet off the floor, just high enough to pass the roll under the
ankles and feet.
Use the half-rolls on the feet. Start at about half way down the shin. This will tie into the leg wrappings securely. Wrap down to the end of the toes loosely. The
feet are like your hands, only more so ? they don't like to be squeezed. The loose ends of the wrap are tucked under the toes and two or three layers are wrapped
around them. End up by going up the log and tearing off.
Photo G
The body wrap is now complete. Furr said, "NO," when it came to wrapping his head. And that's okay, too. That will take a special article of its own, anyway.
What do you do now? If you are into spanking, you'll be surprised at the sensations you can get. One thing to do is cut out hole to access the nipples and/or cock.
Using a pair of scissors, make sure the holes are not too big.
Photo H
After you are done with the appendages, ft is easy to rewrap them with a couple more layers.
When it comes time to release your subject, take a pair of scissors and start at the toes. Cut up from the toes, up the legs and to the groin, using the space between
the legs as a safety margin. At the groin, lift up on the scissors as you cut to keep the scissors away from your subject's body. Slowly work your way up to the neck
in one long cut.
Cut along the top of the shoulders and down the sides to free the arms, pulling back the wrapping as you go. Cut between the feet at the toes, working below and behind
the feet. Presto! You're done and he is out!
Photo I
Do not be surprised if there is a change in your subject. This can be a very heavy trip. Save the head until after my article in the next issue of The Leather Journal
After you do one or two mummifications my way, try a couple your way. For the novice this can be an overwhelming experience. We don't want to scare them off the first
time.
If you have any questions on this or anything to do with rope bondage, or any kind of bondage, drop me a line and I will. try to help.
|
Write to:
|
|
The Leather Journal
7985 Santa Monica Blvd., #109-368
West Hollywood, CA, 90046
C/O Paul Sehm
|
Paul, c/o Papa Bear
5317 Satsuma Ave.
North Hollywood, CA, 91601.
Phone (818) 760-7853
|
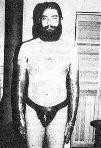
Photo A
|
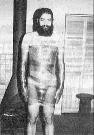
Photo B
|
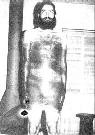
Photo C
|
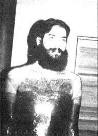
Photo D
|

Photo E
|
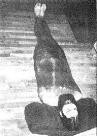
Photo F
|
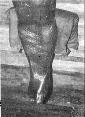
Photo G
|
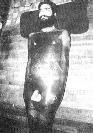
Photo H
|
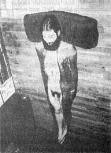
Photo I
|
|


 Articles and Info
 Books
Books Contact Us
 Humor Pages
 Links
Links Stories
 Training
 Welcome
Page
Welcome
Page