Rope Rap
Do it Yourself
by Paul "Papa Bear" Sehm
One way you can tell if you are in touch with your public and to get some idea as to how you are doing is to fuck up and see how many complaints you get. Issue 21
did not turn out to fill your expectations. No, it was not done on purpose to see if Papa Bear can carry an ass full of flack, or to see if Dave Rhodes can keep his
cool, pleasant attitude while handling sharp craft knives. It was a new situation with new problems. One thing remain constant? Murphy's Law. If it can go wrong, it
will go wrong. Maybe not in this issue (I have not seen it yet), but in future issues you will see a much better Rope Rap. I/we are working hard to improve it.
Back in Issue 3 I did an article on a do-it-yourself harness. I am going to give it to you again for two reasons: one, I wanted to try out a new camera procedure
and did not want to waste the time and patience of a model; and two, I wanted to remind those of you who are into rope and bondage that a solo trip can be fun, too.
I am 5' 6" and weigh about 195 pounds. Someone who is 6' 2" and who weighs 175 may want to change the style proportionately. This is how it is supposed
to work. Just like no two bodies are the same, no two harnesses will come out the same. These are only suggestions and blue prints as to how rope bondage works. My
goal is to enlighten you enough so that you will see all the pleasure and advantages for yourself and that you will learn to enjoy them.
Now, remember that you are all alone (or with someone who is understanding), with some time on your hands. Do not rush. Pay attention to your body's responses and
to what feels best. A large mirror will also help. I suggest a medium length of rope (I used 150 feet), rather than a lengthy piece which is harder to keep straight.
When you work on yourself it is easy to get tangled up, not necessarily what I had in mind as solo bondage. The back is the most difficult part of a solo harness,
so keep it simple and concentrate on the front.
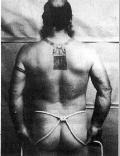
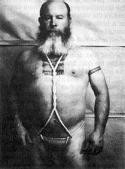
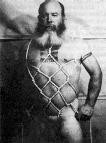
Start in the center with the rope around your waist. Tie a square knot or overhand knot there. I did a square knot. Tie the knot in front and pull it around to the
center of your back. It should fit right above the crack of your ass.
(Photo/Illustration A)
Bring the two running lines down and forward between your legs and then up to the standing line at the waist. Now, if you are so inclined, a butt plug, dildo or
jumbo kosher dill pickle can be inserted up your ass. If you do, and want it to stay there, turn a twist in the lines as they pass through your legs. If you want
to move it around, take it out or replace it with something else, keep the lines straight.
Turn around the standing lines at the waist and run to the sides. Make three full turns in the running lines in front and pass them over your shoulders, running down
your back.
(Photo/Illustration B)
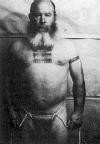
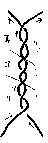
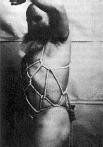
Yes, my beard does get in the way! Take the two running lines and make two or three complete turns. Work them up and position them high in the center of your back by
pulling the lines up and straight out.
(Photo/Illustration C)
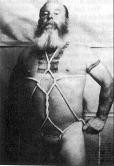
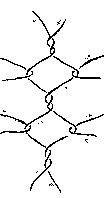
Bring the two running lines forward under the arms to the top full turn and split this turn. This should be done high on your torso. The running lines should come
around your body right under your pectorals and split the first full turn at the base of your sternum. Run the two lines down and to the standing line at the waist
right over the hip. Turn around these standing lines and run to the back.
(Photo/Illustration D)
With the running lines behind you, make two or three full turns and pull them up snug. Take the lines in each hand and pull them up over your shoulders. Pull and
work these lines until the turns are in line with the turns at your shoulders.
There are standing lines just under your arms. You are going to tie on to these standing lines.
Drop one of the running lines over your shoulder. Take the other running line forward and make a full turn around the standing line under your arm as far forward
as you can, run to the front, bring the running line around to your back and bring it up over your shoulder. Do the same thing with the other running line.
Now what you want to do is pull these two full turns from under your arms to a position close to the center of your back. Take up the two running lines and pull
them up over your head, working them back and forth. Sometimes if you cross and pull the lines from left to right, the turns slip better.
No matter how you do it, you should have the running lines coming over your shoulders from the two full turns at the center of your back. Run the lines forward and
down to the standing lines under your pectorals.
Turn around these standing lines, running to the back. Work these turns so that the lines come up to follow the curve of your chest and the turns are near your arm
pits. it is very important that these lines are kept even and straight. The geometric pattern should be even on both sides. Take the time to straighten it and make
sure that both running and standing lines are the same tension and that they work together.
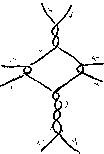
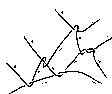
You should have two more full turns somewhere around your stomach. You are going to split these like you did before. Take up the running lines at your arm pits and
run them down to the standing lines at your flank. Turnaround these lines while running to the back.
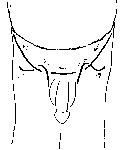
Bring the two running ends forward to the center of your stomach and split the two full turns working them apart and adjust the standing lines so that you can see
the pattern take shape. When you are satisfied with the harness, run the lines down to the standing lines at your waist. You can tie an overhand knot or a turn. at
these lines.
(Photo/Illustration E)
I did a turn, but an overhand knot will hold it firm, However, if this is to be worn as underwear, overhand knots can be uncomfortable.
From here you will run up to the standing lines under your arms. Run the running ends up, turn around the standing lines at your flank (run it to your back) and
up to the standing lines under your arms. Turn around these, run to the back and pull up snug. Work them back under the arms, keeping them even.
Now there is a standing line which runs from the waist to the full turn at the middle of your back. The running ends turn around these and run to the back.
(Photo/Illustration F)
Make a last-minute check to see if what you got is what you want. Make all necessary adjustments, and last, all you have to do is tie the running lines together in
a square knot at the small of your back. Then let the games begin!
For those of you who are into role playing, this harness can be worn by tops or bottoms. If you are a top, I suggest that you do it fairly loose - that will give
you more freedom and range of motion, If you are a bottom, pull it up snug and keep it tight. This will give you more constraint and sensation. Try it, you'll like it!
|
|
|
|
|
Photo and Illustration A
|
Photo and Illustration B
|
|
|
|
|
|
Photo and Illustration C
|
Photo and Illustration D
|
|
|
|
|
|
Photo and Illustration E
|
Photo and Illustration F
|
|


 Articles and Info
 Books
Books Contact Us
 Humor Pages
 Links
Links Stories
 Training
 Welcome
Page
Welcome
Page