Rope Rap
Suspension Harness
by Paul "Papa Bear" Sehm
The other day Robert came over and was telling me of the hot time he had with a leather suspension harness. I could tell by the tone in his voice and the
look in his eyes that Papa Bear was going to have to do some work.
So I decided to kill two birds with one stone. Here it is for you guys who do not have a suspension harness, but have about 100 feet of rope.
The important thing you will have to keep in mind is that there will be a lot of weight (body weight) on one or two places of the body. This weight will have to be
distributed over the body by the structures of the harness. This will depend on the size and shape of your guy.
Robert is a rather big man, and weighs something in the range of 225 pounds, so this will be a major consideration, for Robert and for the house.
I have a suspension frame built into my workroom, so there is little wear and tear on the house. Be careful, someone as well built as Robert can pull down the whole
ceiling if the bolts are not in the right studs. Especially if he squirms around during the magic moments.
The harness is started by using a length of 3/8th inch cotton twist, about seventy-five feet long; depends on the size and shape of your guy.
Begin at the center of the rope. This is placed at about the navel, in line with the apex of the hips. The two running ends go over the shoulders and down the back.
Two full turns are made in front and two full turns in the back. The running ends go around the buttocks, not in the crack, continue between the legs, up to the center
loop. The running ends go through the loop then go to the two standing lines at the back. These are pulled to the sides and tied in an overhand knot.
(Photos A and B)
Now, all these should be rather loose. We will tighten it all up later.
The running ends come up to the front of the body to the standing line at the top of the shoulders. Make a full turn around the standing line at the top of the
shoulders and run down through the back. Turn the running ends around the two standing lines below the two twists and run down to the standing lines at the buttocks,
and turn around them below the knot at the hips. Bring the running ends together, low, at the small of the back into a square knot.
(Photo C)
Now the two running ends can go between the crack of the ass, or can go around the buttocks. There should not be too much weight resting on these lines. These running
ends are brought to the front and up to the standing lines that go from the center loop to the back. Turn around them twice and run them up to the two turns at the
center-back of the body. These turns are split. One turns up and the other turns down. Pull the turns apart until the standing fines firm up a little. Turn around once
and the running ends back to the standing line which comes from the lower back to the top of the shoulders, turn around twice, continue to the standing lines at the
back, turn around these and go to the two turns at the back. Split them the same way as you did at the front.
(Photos D and E)
All of these should be done fairly low on the body. When you split the turns in the front and run to the back, split the turns there. These lines should be lower
than the middle of the rib cage. Split the turns at the back so that they are just below the shoulder blade.
Pull the running lines apart to firm up the turns, and the pull the standing lines down the front of the torso. Not too tight, just firm.
The running ends go up to the standing lines, coming from the shoulders. Turn around, running down; these should be in a line with the armpits. The running ends
go around the body to the front, under the armpits. Turn around the line from the shoulders and go to the standing lines in the center of the body, above the
twists. Turn around and run down to the line running to the back, turn around this twice, and run down to the center standing line below the twists, then turn
around once. Pull these lines up firm. The harness should be comfortably tight by now. Go to the standing line which goes from the hip to the center split, turn
around and go to the standing line which runs from the back to the shoulders, turn around these two. Pull all lines firm!
Run the ends to the back, turn around all standing lines (there should be two) and come to the center of the small of the back. Tie a square knot and the harness
is finished. Draw the left over running ends together in a square knot and pull firm.
(Photos F and G)
Now an S hook or a C hook is added to the rope harness at the top of the shoulders. Be careful to get both lines where they turn around each other. A quick release
hook can be added, and might be a good idea too!
The hooks are latched to a chain and Robert is lifted up off of the floor.
If you do not have a lift, have your guy stand on a box and slowly step off. There will be some slack that will be pulled up by the weight of your friend, so make
sure the box or stool is high enough to let him swing freely.
(Photo H)
Other bondage things can happen from here on, but we'll save that for another time.
By the way, Christmas is coming soon. Wouldn't it be nice to see someone like Robert hanging from your tree!?!
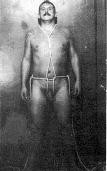
Photo A
|
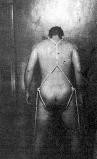
Photo B
|
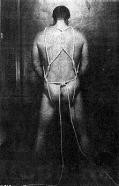
Photo C
|
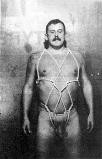
Photo D
|
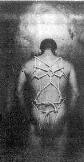
Photo E
|
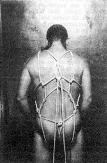
Photo F
|
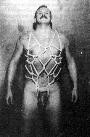
Photo G
|
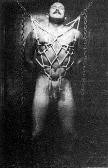
Photo H
|
|
|


 Articles and Info
 Books
Books Contact Us
 Humor Pages
 Links
Links Stories
 Training
 Welcome
Page
Welcome
Page