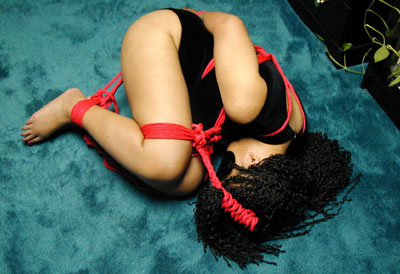
The ball tie is a compact tie that will make your partner feel all compressed and safe, yet unable to escape. It is a comfortable tie, and she should be able to
stay in it for quite a while.
 Step 1:
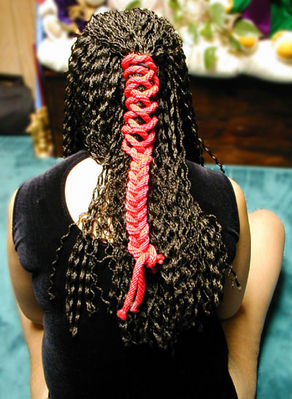
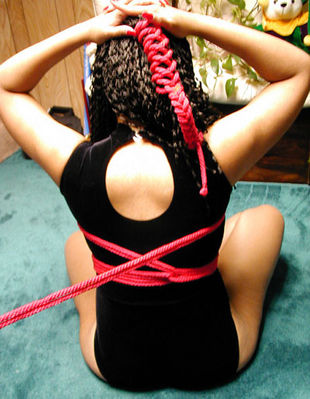
We will start by braiding two ropes into the hair. This is optional. It is described in the separate "Hair Bondage" tutorial.
Step 1:
We will start by braiding two ropes into the hair. This is optional. It is described in the separate "Hair Bondage" tutorial.
|
 Step 2:
Next we apply a breast harness. Double a 25 to 30-foot rope, and wrap the loop around her torso, just under her breasts. Run the ends of the rope through the
loop, and pull the rope in the other direction, so it pulls against the loop.
Step 2:
Next we apply a breast harness. Double a 25 to 30-foot rope, and wrap the loop around her torso, just under her breasts. Run the ends of the rope through the
loop, and pull the rope in the other direction, so it pulls against the loop.
|
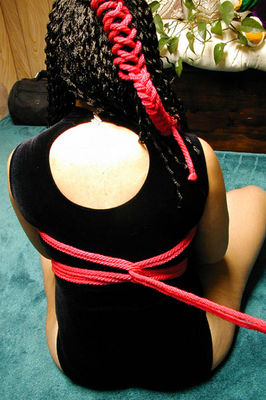
 Step 3:
Wrap the rope around her torso again in the opposite direction, then run the ends through the loop that was formed when you reversed direction.
Step 3:
Wrap the rope around her torso again in the opposite direction, then run the ends through the loop that was formed when you reversed direction.
|
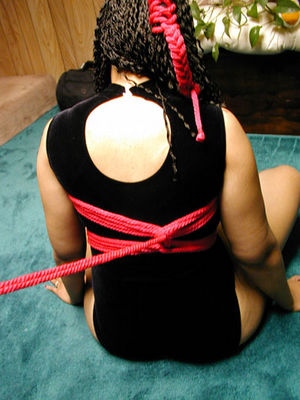
 Step 4:
Now reverse direction again, but this time wrap just above the breasts.
Step 4:
Now reverse direction again, but this time wrap just above the breasts.
|
 Step 5:
Run the ends under themselves, and reverse direction again.
Step 5:
Run the ends under themselves, and reverse direction again.
|
 Step 6:
Take another wrap above the breasts.
Step 6:
Take another wrap above the breasts.
|
 Step 7:
Run the ends under the previous wrap and pull snug.
Step 7:
Run the ends under the previous wrap and pull snug.
|
 Step 8:
Run the ends up under the previous wrap.
Step 8:
Run the ends up under the previous wrap.
|
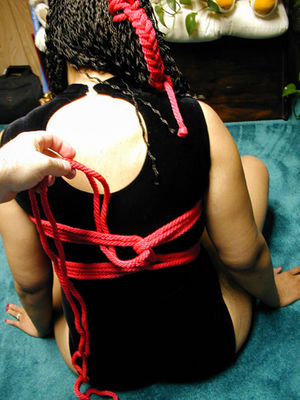
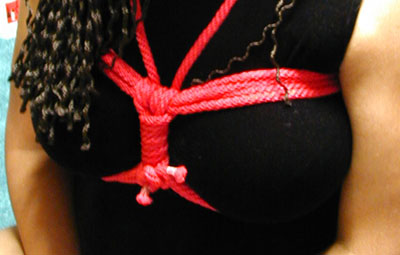
 Step 9:
Now run the ends through the loop you just made, forming a knot that will keep the breast harness from tightening. Pull the knot tight.
Step 9:
Now run the ends through the loop you just made, forming a knot that will keep the breast harness from tightening. Pull the knot tight.
|
 Step 10:
Run the two rope ends up over her shoulders to the front.
Step 10:
Run the two rope ends up over her shoulders to the front.
|
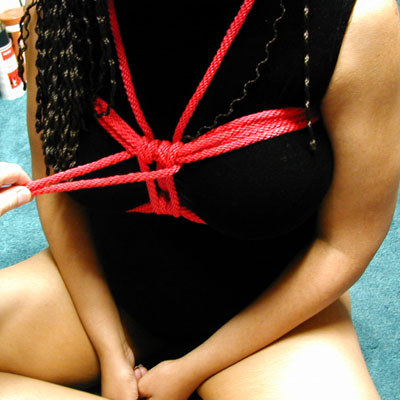
 Step 11:
Bring the rope ends under the upper chest ropes
Step 11:
Bring the rope ends under the upper chest ropes
|
 Step 12:
Take the ends back up, and run them under the upper chest ropes again, forming a loop around the upper chest ropes.
Step 12:
Take the ends back up, and run them under the upper chest ropes again, forming a loop around the upper chest ropes.
|
 Step 13:
Pull the ends tight, snugging the loops around the upper chest ropes.
Step 13:
Pull the ends tight, snugging the loops around the upper chest ropes.
|
 Step 14:
Repeat the same procedure to loop the ropes around the lower chest ropes.
Step 14:
Repeat the same procedure to loop the ropes around the lower chest ropes.
|
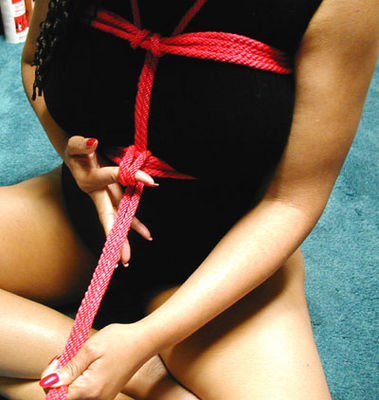 Step 15:
Stick your finger in the loops you just made, and pull out some slack. This will pull the upper and lower chest ropes closer together. Now pull on the ends of
the rope to take the slack back out.
Step 15:
Stick your finger in the loops you just made, and pull out some slack. This will pull the upper and lower chest ropes closer together. Now pull on the ends of
the rope to take the slack back out.
|
 Step 16:
Run the rope ends up and under the upper chest ropes again. Pull on them and work some more slack out, bringing the chest ropes closer together. This will make
it easier to anchor the knees to the chest harness, but more importantly, it will provide pleasant pressure on the breasts, making them more sensitive.
Step 16:
Run the rope ends up and under the upper chest ropes again. Pull on them and work some more slack out, bringing the chest ropes closer together. This will make
it easier to anchor the knees to the chest harness, but more importantly, it will provide pleasant pressure on the breasts, making them more sensitive.
|
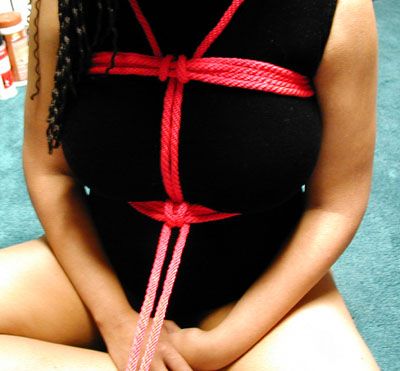
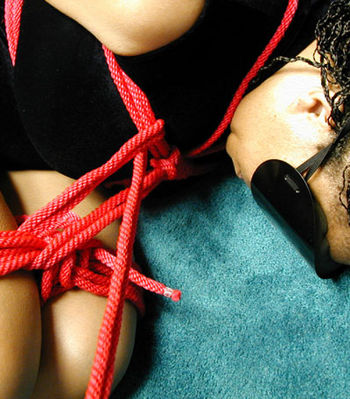
 Step 17:
Take the remaining ends, and wrap them around the ropes between the upper and lower chest ropes. This will tighten up the ropes, and also make them look more tidy.
Step 17:
Take the remaining ends, and wrap them around the ropes between the upper and lower chest ropes. This will tighten up the ropes, and also make them look more tidy.
|
 Step 18:
When you get to the bottom, run one end under the lower chest ropes, then tie a square knot in the ends.
Step 18:
When you get to the bottom, run one end under the lower chest ropes, then tie a square knot in the ends.
Now we've completed the breast harness.
|
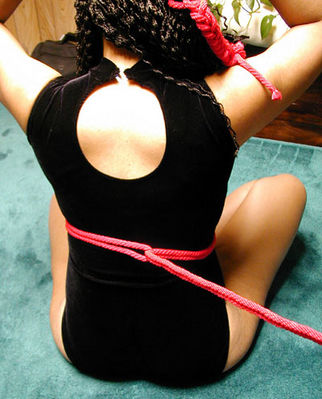
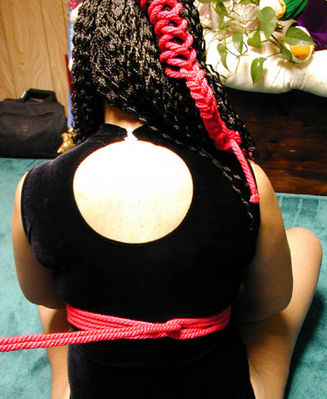
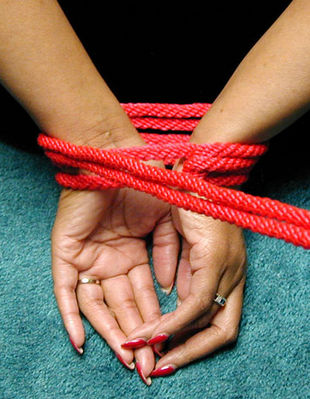
 Step 19:
Have your partner put her hands behind her, with her palms together.
Step 19:
Have your partner put her hands behind her, with her palms together.
Take a 12-foot rope and double it. Wrap the loop around her wrists, and run the ends through the loop.
|
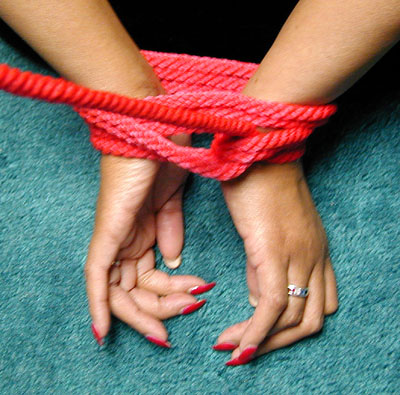
 Step 20:
Reverse the direction of the rope, so it pulls against the loop, and wrap it around the wrists a couple more times.
Step 20:
Reverse the direction of the rope, so it pulls against the loop, and wrap it around the wrists a couple more times.
|
 Step 21:
Take the ends, and run them through the loop that was formed when you changed directions.
Step 21:
Take the ends, and run them through the loop that was formed when you changed directions.
|
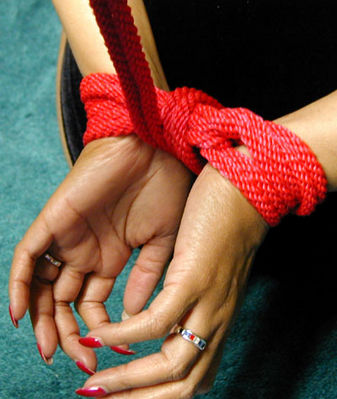 Step 22:
Now wrap the rope crosswise, forming cinch loops. Don't cinch the ropes too tight; you don't want to put too much pressure on the wrists and cause nerve damage.
Step 22:
Now wrap the rope crosswise, forming cinch loops. Don't cinch the ropes too tight; you don't want to put too much pressure on the wrists and cause nerve damage.
|
 Step 23:
After you do three wraps, take one of the rope ends and run it under the wrist wraps.
Step 23:
After you do three wraps, take one of the rope ends and run it under the wrist wraps.
|
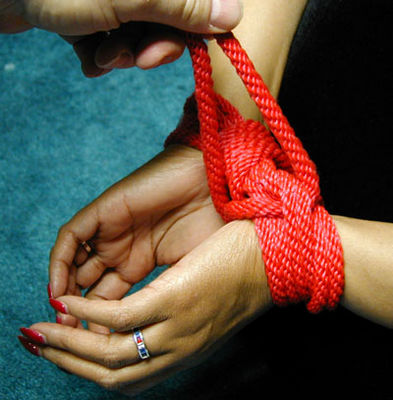
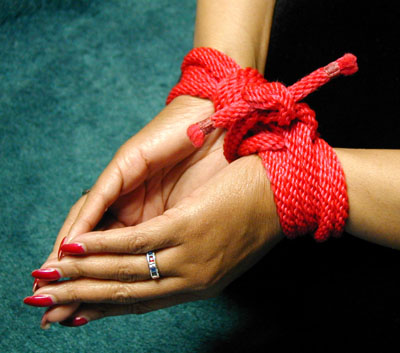 Step 24:
Take the two ends, and tie them in a square knot.
Step 24:
Take the two ends, and tie them in a square knot.
|
 Step 25:
Now that her hands are secure, we can tie her knees. Take a 25 to 30-foot rope and double it. Wrap the loop around her legs, just above the knees, and run the
ends through the loop.
Step 25:
Now that her hands are secure, we can tie her knees. Take a 25 to 30-foot rope and double it. Wrap the loop around her legs, just above the knees, and run the
ends through the loop.
|
 Step 26:
Reverse the direction, and take a couple more wraps around the legs.
Step 26:
Reverse the direction, and take a couple more wraps around the legs.
|
 Step 27:
Take the ends of the rope, and run them through the loop that was formed when you changed directions.
Step 27:
Take the ends of the rope, and run them through the loop that was formed when you changed directions.
|
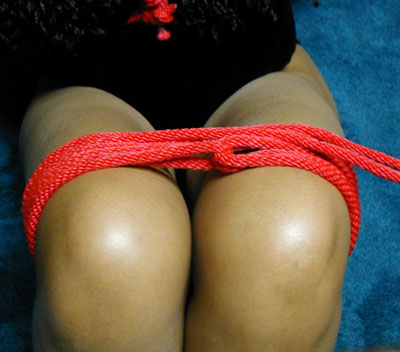
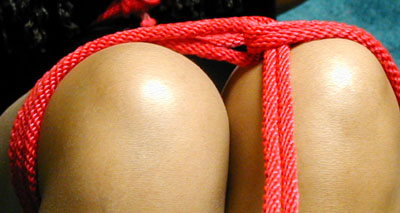
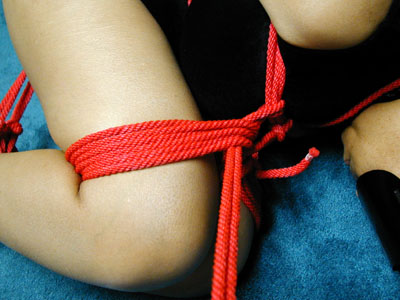
 Step 28:
Now take three crosswise wraps, making cinch loops. Note that we are not cinching the knees very tight. When the legs are bent, they will expand, tightening up
the ropes. If we cinch them too tight now, they will be much too tight when the legs are bent.
Step 28:
Now take three crosswise wraps, making cinch loops. Note that we are not cinching the knees very tight. When the legs are bent, they will expand, tightening up
the ropes. If we cinch them too tight now, they will be much too tight when the legs are bent.
|
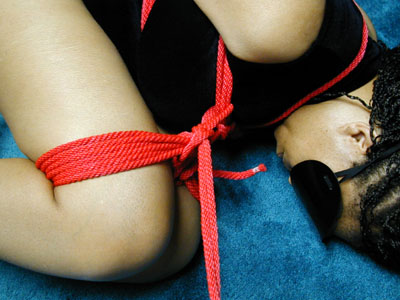
 Step 29:
Take one of the ends, and run it underneath the knee wraps, then tie the ends together with a square knot.
Step 29:
Take one of the ends, and run it underneath the knee wraps, then tie the ends together with a square knot.
|
 Step 30:
Now is a good time to gently lay her on her side. It will be much harder to move her once the tie is completed.
Step 30:
Now is a good time to gently lay her on her side. It will be much harder to move her once the tie is completed.
|
 Step 31:
Reverse the direction, so the rope pulls against the loop, and make three or four more wraps around the ankles.
Step 31:
Reverse the direction, so the rope pulls against the loop, and make three or four more wraps around the ankles.
|
 Step 32:
After you have made the wraps, run the rope ends through the loop that was formed when you changed directions.
Step 32:
After you have made the wraps, run the rope ends through the loop that was formed when you changed directions.
|
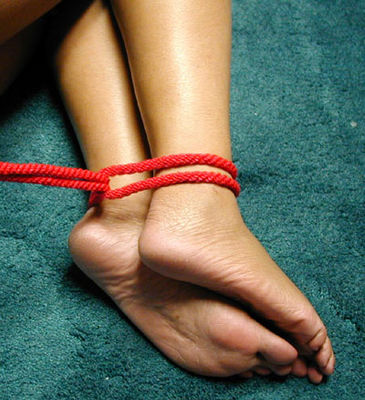
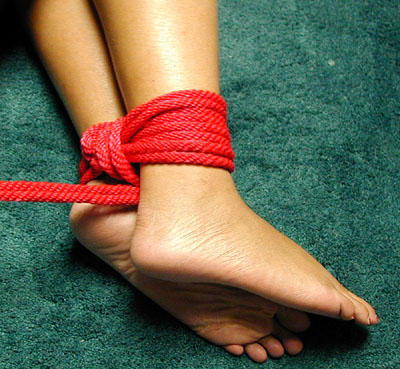 Step 33:
Now take a few crosswise wraps, to form cinch loops. The ropes should be snug, but not too tight; you don't want to make her feet fall asleep.
Step 33:
Now take a few crosswise wraps, to form cinch loops. The ropes should be snug, but not too tight; you don't want to make her feet fall asleep.
|
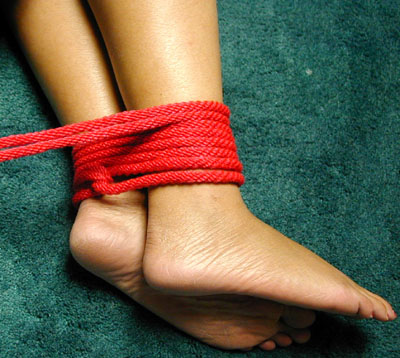
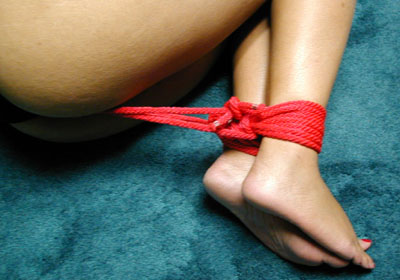
 Step 34:
After you've done the cinch loops, run the ends underneath the ankle wraps. (Between the two sides of the wraps, not cinching them.) Don't pull it tight yet; leave
a little loop.
Step 34:
After you've done the cinch loops, run the ends underneath the ankle wraps. (Between the two sides of the wraps, not cinching them.) Don't pull it tight yet; leave
a little loop.
|
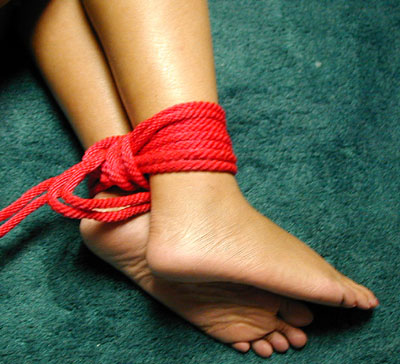
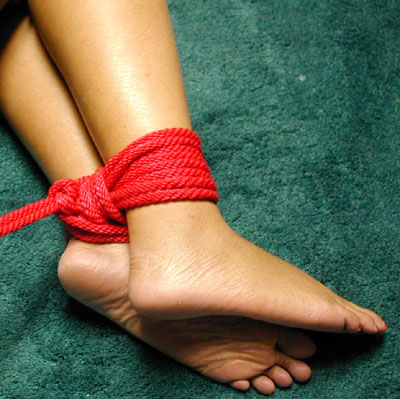 Step 35:
Now run the ends through the loop you just made, forming a knot. This will keep the ankle wraps from tightening up. Pull the ends of the rope tight. You should
have several feet of rope left over.
Step 35:
Now run the ends through the loop you just made, forming a knot. This will keep the ankle wraps from tightening up. Pull the ends of the rope tight. You should
have several feet of rope left over.
|
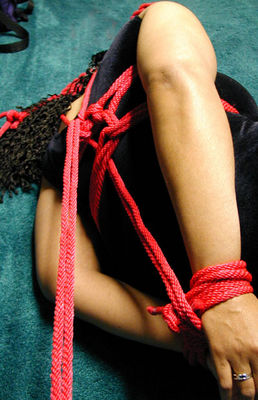 Step 36:
Now we've come to the fun part, the final assembly.
Step 36:
Now we've come to the fun part, the final assembly.
Take the excess rope from the foot tie, and run it between her wrists, so it crosses the wrist bonds, then run it up underneath the lower and upper chest
ropes. Gently press her legs against her thighs, and pull the rope taut.
|
 Step 37:
Run it back down, crossing her wrists again, down to her feet.
Step 37:
Run it back down, crossing her wrists again, down to her feet.
|
 Step 38:
Run one end underneath the ankle wraps, then tie a square knot in the ends.
Step 38:
Run one end underneath the ankle wraps, then tie a square knot in the ends.
|
 Step 39:
Take a 12-foot length of rope and double it. Run the loop under the upper chest ropes, then run the ends of the rope through the loop. This anchors the rope to
the upper chest ropes.
Step 39:
Take a 12-foot length of rope and double it. Run the loop under the upper chest ropes, then run the ends of the rope through the loop. This anchors the rope to
the upper chest ropes.
|
 Step 40:
Run the rope ends under the knee wraps, then back up and under the upper chest ropes.
Step 40:
Run the rope ends under the knee wraps, then back up and under the upper chest ropes.
|
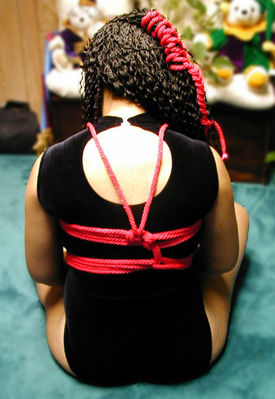
 Step 41:
Gently fold her legs so that they are close to her chest, and pull the slack out of the rope.
Step 41:
Gently fold her legs so that they are close to her chest, and pull the slack out of the rope.
|
 Step 42:
Now tie a knot around the rope to hold it in place, as we have been doing.
Step 42:
Now tie a knot around the rope to hold it in place, as we have been doing.
|
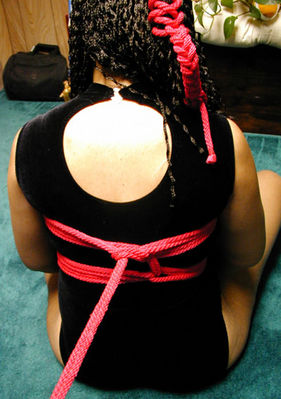
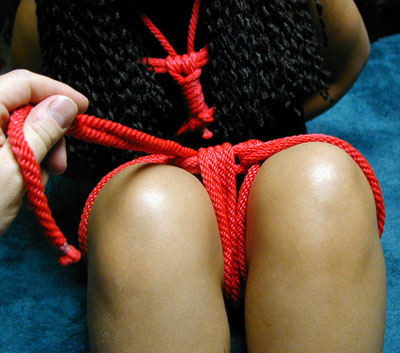
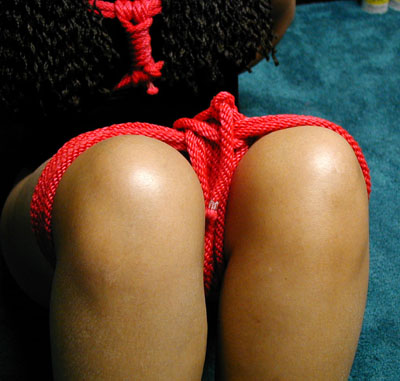
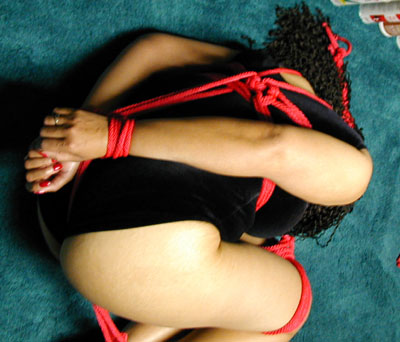
 Step 43:
Now all we have to do is to tie the hair braid we did at the beginning to the knee ropes, and we are all finished. She is a nice compact ball.
Step 43:
Now all we have to do is to tie the hair braid we did at the beginning to the knee ropes, and we are all finished. She is a nice compact ball.
|
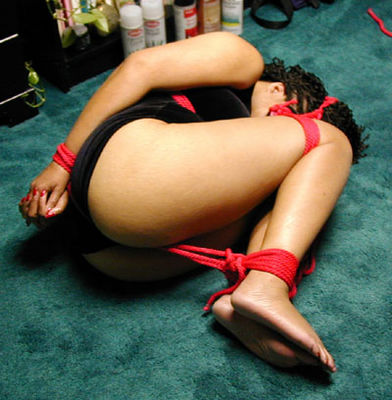 Step 44:
I hope you have as much fun with this tie as we do.
Step 44:
I hope you have as much fun with this tie as we do.
Have fun, and play safe!
|


 Articles and Info
 Books
Books Contact
Us
Contact
Us Humor
Pages
Humor
Pages Links
Links Stories
 Training
 Welcome
Page
Welcome
Page