|
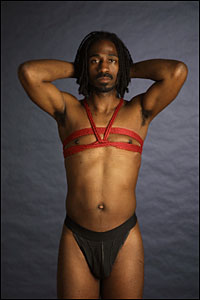
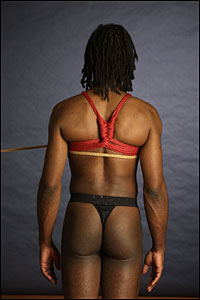
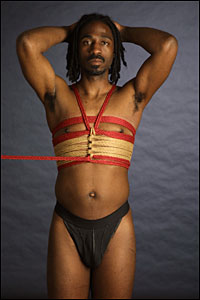
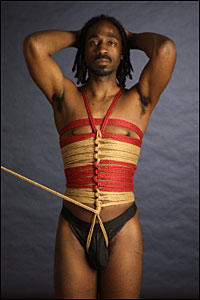
Step 1:
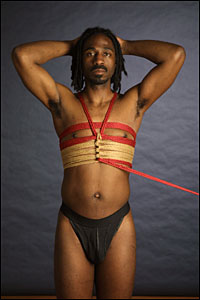
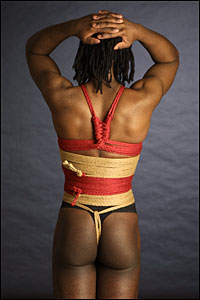
Start by tying a breast harness. In this variation of the breast harness I have a very simplistic breast harness, but you can tie yours as intricately as you please.
text/rope: Bridgett Harrington
photography: Kenji
model: DeLano N. Distress
|
|
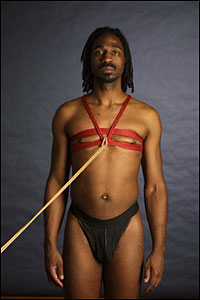
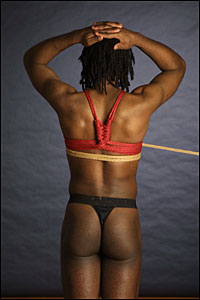
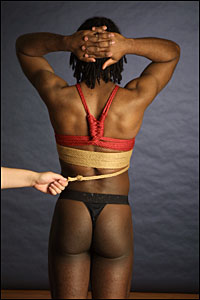
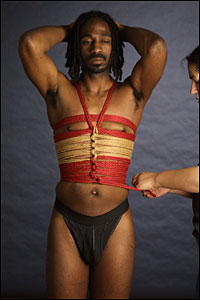
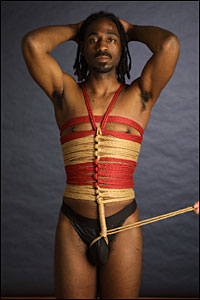
Step 2:
Run the bight of your doubled rope (I use 10m pieces, but you can use any length you like as long as it can go around a torso at least 5 times) through the center
of the front of your breast harness. Run the tails' end through the bight, creating a lark’s head knot. The lark’s head is the key to creating this sort of rope
corset
|
|
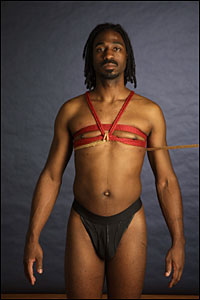
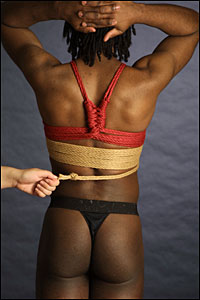
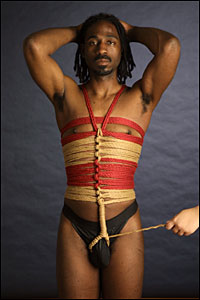
Step 3:
Wrap the rope around the person’s body, directly under the bottom line of the breast harness
|
|
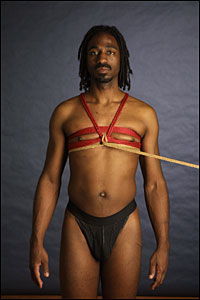
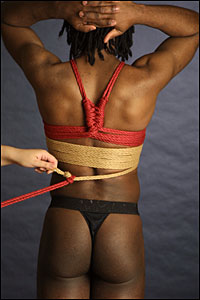
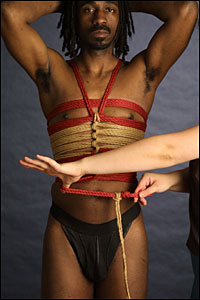
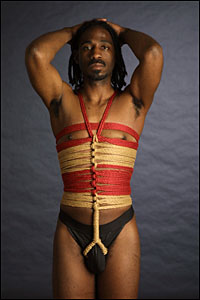
Step 4:
Run the tails end under the line you just used to pass around the body. Then pull the rope in the opposite direction, creating tension on the line
|
|
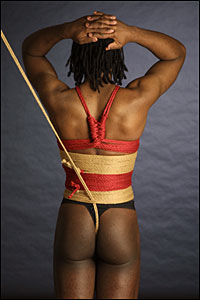
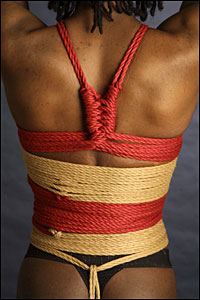
Step 5:
In back, there should only be a smooth, simple double-line
|
|
Step 6:
As you continue, make sure that the lines lay flat on the sides and back, one below another, with no twists, overlaps, etc
|
|
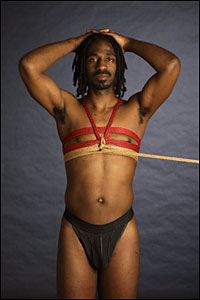
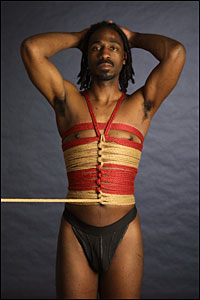
Step 7:
In front, you will be passing each wrap around the body, then tucking the tails end under the ropes from just the line before. This creates the ripple effect you
begin to see here. Make sure that you cinch the line tight, but not too tight, at each wrap, as going back after about 6wraps is a challenge. Make sure your line
of lark’s head knots is a straight line, when possible, to increase the aesthetic flair of the design
|
|
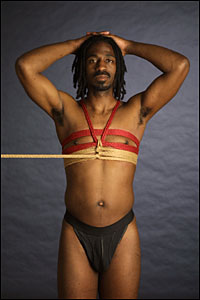
Step 8:
Continue with more wraps, with the lark’s head line centered, the ros of lines smooth against one another, and when bored, prod the bottom a bit to keep
them awake as this can be a lengthy process to get a rope corset on
|

|
Step 9:
If you notice any slight gaps between lines, try to go back and smooth them out- a good rule of thumb is to pause every 4-6 wraps and correct tension between
wraps, gaps, and overlays
|

|
Step 10:
Oh no! What do you do when you run out of rope, but what to keep going?
|
|
Step 11:
Tie a simple overhand knot in the end of your doubled line
|
|
Step 12:
A slightly closer look
|
|
Step 13:
Add your next piece by taking the bight of the doubled second piece, placing it behind the 1st rope, then run the doubled line end through the bite- just as you
did when you began this process. Tighten everything down, and it should look like this
|
|
Step 14:
Keep going, as if you were working with the same piece of rope. What about that knot? We’ll take care of that at the end
|
|
Step 15:
Keep going…
|
|
Step 16:
And going…
|
|
Step 17:
And spice on additional lines as you need them. You can use all the same color of line, butI find contrasting colors to be rather striking
|
|
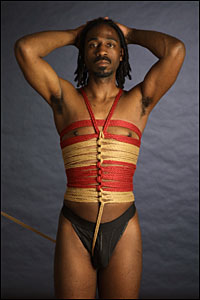
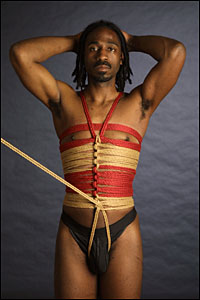
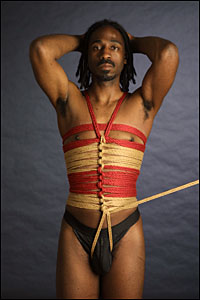
Step 18:
And keep going… you can keep going for as long as you like, but in this case I will wrap to the top of DeLano’s hips. You can end the corset here if you so
desire, by tying off the line and tucking the ends- but I have a fair amount of rope left, so I’ll be continuing with a crotch rope
|
|
Step 19:
Run the doubled line through the legs. On men, and women who have any genital piercings, please make sure to dodge the genitals by passing to one side or another
|
|
Step 20:
On the back side, run the line underneath the bottom wrap or two of the corset
|
|
Step 21:
Then pull back down through the legs, to the other side of the groin, and back up under the bottom wrap of the corset on the front
|
|
Step 22:
Wrap the line end underneath the lines that passed around the groin (or through the groin, if you so choose.)
|
|
Step 23:
Wrap over then underneath again and again
|
|
Step 24:
Keep going… I’m effectively creating a rope cock ring at this point. How far down do you go? What if you have *lots* of extra rope? Be creative. Pull out a
macramé book. Tie their hands into their groin. Do whatever makes you happy. I go until I can only fit a finger or two underneath the lines
|
|
Step 25:
Split the doubled line, and take each end and wrap around the sides and base of the rope cock ring, the same way you had been doing with the doubled line. Make
sure you go the same direction you had been going with the doubled line, or else you’ll end up unraveling your initial work
|
|
Step 26:
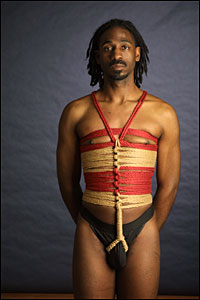
Finished
|
|
Step 27:
Oh, what about those knots!
|
|
Step 28:
Very carefully, tuck them underneath the finished corset lines. Smooth everything out. Get yourself something to drink, you’ve been working very hard
|
|
Step 29:
Okay, *now* you’re finished. Go show off your artwork to a friend, or bring your very cooperative rope model/bottom a mirror! Hell, get a camera and take a
picture. And bring your model/bottom a drink too while you’re at it. It takes a lot of energy to stand perfectly still or keep turning in circles for that
long.
|


 Articles and Info
 Books
Books Contact
Us
Contact
Us Humor
Pages
Humor
Pages Links
Links Stories
 Training
 Welcome
Page
Welcome
Page