
|
Step 1:
We start with either two lengths of 25' to 30' rope, or one long 50'+ length. We're illustrating the two rope version for those that don't have a long
length in their rope bag.
text/rope: Paul
photography: Kenji
model: Rose
|

|
Step 2:
Here we've found the midpoints of our two ropes and linked them together.
|

|
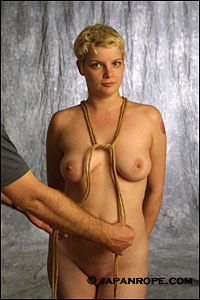
Step 3:
One length goes over each shoulder, with the midpoints like so. An important note at this point: don't bring this tight against the back of the neck. It should hang
loose or you won't be able to do adjustments later.
|
|
Step 4:
A simple overhand twist of the two lengths produces this form. There are almost no actual knots in this tie.
|
|
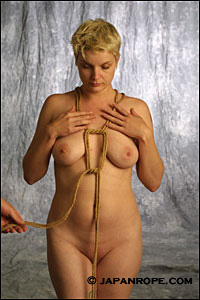
Step 5:
Another twist below the breasts.
|

|
Step 6:
And two more twists as we're going down the body. Keep these three loops open and loose. They're going to be pulled into shape as we go and to keep even placement
and spacing we need that slack.
|

|
Step 7:
Pull both lengths of rope, all four ends, through the legs. There's a lot of rope to handle in this tie, but you'll be amazed at how quickly you run out.
|
|
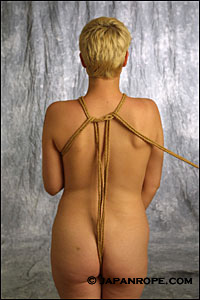
Step 8:
Run your two lengths of rope under the looped bit at the back of the neck. One length goes around front to the left, one to the right in this fashion.
|

|
Step 19:
And now we begin to spread those tortoise shell patterns. Run your ropes under or over and pull gently -- don't pull tight at this point. Take your ropes around
the back bringing the right side rope to the left, and the left around to the right...
|
|
Step 10:
...and this time we go under the breasts. Now it's just a matter of going around the back, to the front, over or under the loops, and out back again to repeat
once more.
|
|
Step 11:
Here's an illustration of a couple more passes.
|
|
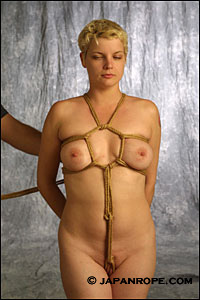
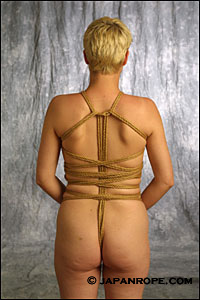
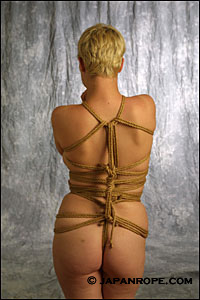
Step 12:
And here's the back with the top two of the three tortoise shell hexagons done. We're just able in this example to do the top half of the last hexagon before tying
off in the back. In the next step we'll bring those lines back...
|
|
Step 13:
And then knot this portion off because we've exhausted our rope. We'll add more rope in the next step.
|
|
Step 14:
Double a new length of rope. Take the bight and knot it around a section of the ropes running up through the legs. I've created an oversize bight loop here
for illustration purposes. You can knot this in other ways, but we'll show you how this small loop can be useful in the next steps of the tutorial.
|
|
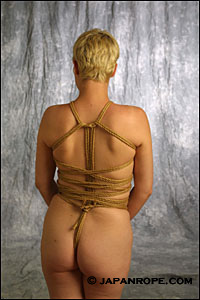
Step 15:
Okay, big jump in steps. It's really simple though. We've taken our rope out around the front, looped the bottom half of the hexagon once, come back around
to the other side, done the other bottom half of the hexagon, and come to the back again. Our free ends are then going around a portion of the last ropes we've
done to fix a point at the bottom, then we've gone up to the back of the neck, run the ropes under that and down through the bight loop we left when we added
the rope, pulled tight -- not too tight -- and wrapped our remaining rope around to neaten things up.
|
|
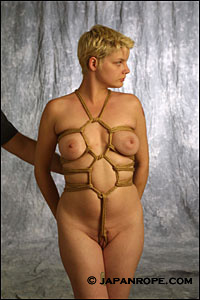
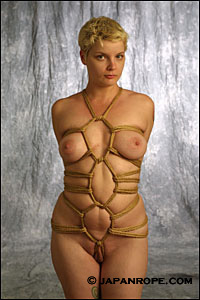
Step 16:
Here's the view from the front.
|

|
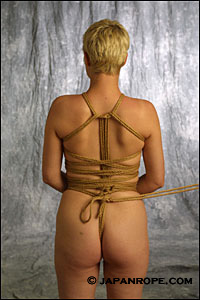
Step 17:
And a side view. Have fun with this one.
|


 Articles and Info
 Books
Books Contact
Us
Contact
Us Humor
Pages
Humor
Pages Links
Links Stories
 Training
 Welcome
Page
Welcome
Page